Friday, October 31, 2014

Works on Paper-October 2014

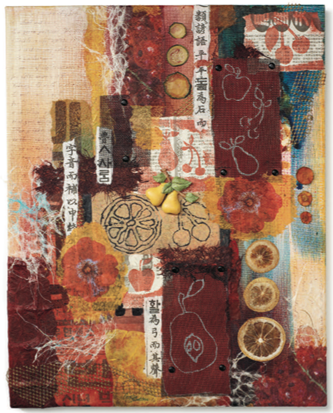
So I am half way to completing 20 Works on Paper. I started in August and I am giving myself to the end of 2014 to complete the work. It's been quite a good motivator, just to keep me going and moving forward.

10"x 8"

Blanket Stitch I, 15"x 11"

Birch Trees I, 12"x 9"

Le Divan, 9"x 12"

La Buffet, 9"x 12"

Blanket Stitch II, 11"x 15:

Blanket Stitch I, 15"x 11"

Lady of Summer 9"x 12"

Lady of Spring 12"x 9"

24"x 18" Unfinished

24"x 18" work in progress

Sunday, October 19, 2014

6 Tips for Hand Lettering

By Cherie Haas, Online Editor, Cloth Paper Scissors Today

They say that you can tell a lot about a person by her handwriting. Clear, neat writing indicates orderliness; a messy script signifies a love of long walks on the beach. Actually, I made that one up. But you know what I mean—it seems as though some writing styles reveal personality traits of the writer, not very different from a handshake, for example.

There may not be much that we can do about our handwriting, but when it comes to creative hand lettering, you’re in control. By using different mark-making tools, you can set the tone for your message. For example, have you ever considered using a paintbrush to write words and phrases in your sketchbook? There’s an entire episode of Mixed-Media Workshop TV dedicated to hand lettering techniques: “Write It Up” teaches you how
 to write with a paintbrush (watch a preview here).

Hand lettering techniques to practice
Learn hand lettering techniques with Jenn Mason and Julie Fei-Fan Balzer at Mixed-Media Workshop TV.  


To Brush or Not To Brush by Jenn Mason (inspired by “Write It Up”)

When working on lettering in a painting, collage, print, or art journal, consider using a paintbrush! Brushes will help you release any hate you may harbor for your handwriting. By thinking of the letters as shapes instead of handwriting, your can refocus the control of your hand in a new way. Want to give it a try? Here is a list of ideas for using brushes in your next mixed-media project.


1. Use a round brush with long bristles and thinned-down paint to go all scripty.
2. A big flat brush with short bristles is fun for graffiti-style letters on the background of a big painting.
3. Fine detail brushes are great for signing your name in a very professional way.
4. Try holding a long-handled round brush close to the end, away from the bristles, for a casual and loose letter feel.
5. Don't forget to write with natural bristle brushes in your next encaustic painting.

6. Hold a flat brush at a 45-degree angle (like a calligraphy pen) and try a little fancy lettering. ~J.M.

Now that you have some new hand lettering ideas, here comes the hard part: knowing what to say! Is there a word or phrase that comes up often in your art?

Monday, September 22, 2014

My Set of Postcards- Coming Soon!

Exciting News! 
You can now get Amena's Art Work on a Postcards!

Need a Handmade Card to send someone special or to keep for yourself.

You can now have an original. Amena has specially designed a new series of art for note-cards.


Example of Note-Cards construction.
step one

step two & three

step four

step five & last touches, finished!


Sunday, July 6, 2014

Easy Image Transfer Techniques for Photo Quilts and More

"Here are some of my art works that I've done by image transfer, but not with Citrasolv, I have not tried that product yet, it seems much easier than the way I do it. Amena B." 
"Daddy's Little Helper" by Amena Butler


"London Travel" by Amena Butler

"Sabbatical" by Amena Butler


article by Quilting Daily
This summer has hardly begun, and it's already been a busy one for my family: graduation, a college orientation trip, camp drop-offs, and even a few hours of gardening.
image transfer techniques with citrasolv
Transferring an image to fabric with Citrasolv is one of several
image transfer techniques described in In Stitches Vol. 11.
Art by Jane Davila.
As a result, I've been snapping pictures right and left. Mostly they end up on Facebook, but I'd like to think some might work their way into my fiber art.
There are several ways to use digital imagery in your quilts. You can:
  • Create a portrait quilt by using fabric pieces and thread to "paint" the features, shadows, and highlights of the person from the photo.
  • Use pictures from your trip to the seashore or the country as inspiration for a landscape quilt in a realistic or stylized way.
  • Print the photos using an inkjet printer onto prepared fabric or transfer paper and use the image (or several) to make a photo quilt.
  • Transfer your photos onto fabric using gel medium or other wet transfer method. (Note: These methods are for art quilts and other fiber art that will not be washed.)
In the new edition of the interactive eMag Quilting Arts In Stitches, Vol. 11, Editor Jane Dávila reviews several different photo printing methods and image transfer techniques, including a very simple one using Citrasolv® Natural Cleaner & Degreaser:

1. Print an image in reverse onto plain copy paper using a laser printer (or toner-based copy machine).
2. Cut the copy paper around the image, and place the paper face down onto the fabric you have chosen.
3. Dab a small amount of Citrasolv onto a foam brush. Apply the Citrasolv to the back of the copy paper, holding it tightly or taping it down to prevent shifting. The Citrasolv will immediately saturate the paper, and the image will appear on the fabric. Only a very small amount of Citrasolv is needed-just enough to moisten the paper but not soak it.
4. Burnish the back of the paper with a bone folder or spoon to transfer the image. Be sure to work on a smooth surface to ensure a crisp transfer.
5. Remove and discard the paper, and allow the fabric to dry before using it.

In Stitches Vol. 11 is full of ideas, tutorials, videos, and slide shows to help you turn you photos into beautiful quilts and fiber art creations. Download it now, and start creating with photos and fabric today.

Editor, Quilting Daily

Free Guide to Art Stamps - Cloth Paper Scissors E-zine

"Being a mixed media artist, I love to make my own stamps and texture surfaces for my backgrounds for my art work. Here is a super cool pdf with ideas and techniques for stamp building and carving. Enjoy! P.S. Here are two of my pieces that have some stamp work. 
Amena Butler" 


L-"Sweet Dreams", R-"Lemon Sister" by Amena Butler


It's nice to be able to go to an art supply store and buy rubber stamps for your mixed-media art projects, but you also like to make things yourself, right? Try making your own art stamps! In this free eBook from Cloth Paper Scissors, a Guide to Art Stamps: Fun Ideas and Easy Stamping Techniques, talented artists show readers how to make art stamps, foam stamps, and roller stamps; share stamp-carving techniques; and present ideas for using your stamps. Use these techniques to make backgrounds, design your own printed fabric or papers, or create a unique piece of art.
Free stamping eBook  
Garden Collage (16x20) by Cecilia Swatton


Almost any design can be turned into an art stamp, including your signature or favorite flourish, but you need the right tools to make stamps. Learn the tools of the trade in "A Look At . . . Stamp Carving Supplies." There are some basic items  you'll want on hand: carving blocks, a bench hook, carving tools, inks and paints, brayers, and barens. In this beginner's guide, you'll also learn a few tips for making clean stamp impressions.

Next, you're ready to "Make Your Own Stamps with Dies and Foam" with Danee Kaplan. While experimenting with foam door hangers, she came up with this stamping technique: "I die cut some butterflies and decided to see if I could alter the surface of the foam to add some dimension to the stamp," Danee says. "What I came up with gives the look of a hand-carved stamp but is much easier, faster, and doesn't require any specially purchased carving tools." In addition to teaching you the steps to make your own stamps, Danee shares ideas for adding details and stamping with precision. "Mounting the die-cut shapes on acrylic blocks or clear plastic makes it easy to line up the stamp right where you want," she advises.

 In "The Workshop: Roll Out the Backgrounds," Linda Calverley shows how to make your own rolling stamps for paper and fabric. Using mostly recycled cylindrical objects, glue, and cutting tools, she explains how to carve rolling stamps from corks and foam insulation. Linda also gives stamping ideas for rollers and patterns and offers tips on how to stamp with these objects.

"Having a fling with several art-making processes, I've created an array of elements for Garden Collage (featured here) and other art pieces," says Cecilia Swatton. "My dabbling included three simplified versions of printmaking: foam-plate printing, collagraphy, and stamping with original-design, hand-carved rubber stamps. The resulting prints have a primitive, hand-drawn look that can make your collage as unique as a signature." Learn Swatton's stamping techniques in "Print Fusion," as she walks you through the steps to make your own stamps.

In this free Guide to Art Stamps: Fun Ideas and Easy Stamping Techniques, you'll get a wealth of ideas for stamping and making signature works that are uniquely yours. Inspired? Click here to let your Twitter followers know that you're going to "make an impression" with your own stamps! 

Cherie Haas, Online Editor-Cloth Paper Scissors Today

It's Okay if you don't Like My Art by Dina Wakley

"The article inspired me to do my own fun girl". 
Amena Butler


article by Cloth Paper Scissors Today
It doesn't take long to realize that mixed-media artist and Art Journaling Live instructor Dina Wakley likes to have fun, especially when she's teaching and sharing art journal ideas. Her secret? "I have a good sense of humor and try not to take myself too seriously. I'm pretty dorky," she said in an exclusive Q&A with me. Here's more:

 
I love the sincerity and vulnerability shown in
this art journal page by Dina Wakley.


CH: What's one mistake that you've made as an artist, and what did you learn from it?
DW: Thinking that everything I do has to be good. And, thinking that I have to 
be good at something immediately. In reality, art takes practice! You work and work and work and, if you're lucky, you get a few good pieces with lots of learning experiences in between. 

CH: What's the best art advice that you've received, or your favorite bit of advice to give to students?
DW: I always tell students that art journaling is NOT about making good pages, it's about expression. I always say done is better than perfect, and suppliers will always make more paper!

CH: Any funny stories or anecdotes relating to your art workshops you'd like to share?
DW: Once I gave a group a lecture about being careful where the nozzle is pointing when you use spray ink. Then I proceeded to spray green ink up my neck and face. Yep, do as I say, not as I do!


CH: Who should watch Art Journaling Live?
DW: Everyone! Art Journaling Live has techniques and tips that will fuel your art making for months and months.

CH: Just for fun—what's your favorite ice cream?
DW: Mint Oreo cookie.


Get a sense of the lighthearted and inspiring nature of Dina's workshops in this preview of Art Journaling Live, an online experience for artists like you. In addition to Dina, the video also features art journaling superstars Julie Fei-Fan Balzer, Pam Carriker, and Traci Bautista. Now it's your turn! What's one mistake that you've made as an artist, and what did you learn from it?
 Cherie Haas, Online Editor
Cloth Paper Scissors Today

Monday, June 9, 2014

Elizabeth St. Hilaire's Colorful Collage


This Art Inspiration comes from The Artist's Magazine (April 2014), in which artist Elizabeth St. Hilaire Nelson is featured for her mixed-media techniques that result in the colorful collage work you see here.
Koi 7 (acrylic, collage, 20" x 24") by Elizabeth St. Hilaire Nelson


Painting & Shredding Paper by Maureen Bloomfield

"On American Easel panels that she primes with several coats of acrylic gesso, Elizabeth St. Hilaire Nelson draws an outline of an intricate design. She then paints the separate segments of the design with fluid acrylics. On top are shreds of paper that she has meticulously torn and either already painted or painted and retrieved in a process that includes weaving, layering, and ‘pushing and pulling colors, values, and patterns' that, she says, ‘makes collage like music.' The result is a riotously colored, highly textured surface that's a palimpsest, with traces of words that move in and out of the viewer's focus.

"Given the diverse range of effects evident in her work, it's clear that the artist has a number of techniques at her command. One of the most unusual resulted in the spots visible on the koi in the series shown here, which started as studies for a public art contest, ArtPrize, in Grand Rapids, Michigan. ‘To create the organic spots on the koi,' says St. Hilaire Nelson, ‘I put black gesso or deep brown fluid acrylic paint on my toes and walk all over rice paper. Any time you see dark spots on the koi, they are, in fact, my toe prints that I then tore out of the paper and glued down.' As a result, she says, ‘A little bit of me is in every fish!'"


I would have never considered using part of my foot to create a mark, but St. Hilaire Nelson's results are perfect—the shapes are organic, and they fit naturally within her collaged subjects. Ideas such as this abound in issues of The Artist's Magazine, which showcases art in all media.

Friday, March 7, 2014

Come See Me


If Your in the City. Come See Me Tomorrow at the Harding Fine Arts Academy Spring Fest.
3333 N. Shartel. I will be there 10 am- 4 pm. Come see what I have on Sale.

Arts Trek
Come Join me in Shawnee, OK at the 2014 Arts Trek. April 12th Rain or Shine! 10 am - 4 pm Free  and Open to the Public. I will be demonstrating some collage techniques and selling my work.

Rain or Shine!

Performance Walk:10am-12pm

Arts Festival: 
10am-4pm

Free & Open to All!

St. Gregory's University Campus
1900 W. MacArthur, Shawnee, OK 7480

Wednesday, March 5, 2014

New Horizontal- March

These two pieces, I have just finished for an exhibit in May. I like this horizontal substrate, I was encouraged a couple of years ago when I did a similar piece, but didn't follow up on the creation.
I should have done some of these sooner, I am enjoying this style.

 Both pieces are 12"x24", Mixed Media

Monday, February 10, 2014

Printmaking with Carla Sonheim

These are some of my recent practice prints. I was watching a class with artist Carla Sonheim and decided to get involved  and get back into the swing. It was fun! I will continue working on some printmaking for a project coming up next year, while finishing up on pieces for this years show. Deadlines!!!!


One Sheet Booklet -DIY

Something I might try at one of my art classes.

Groovy Folded One-Sheet Booklet Video Tutorial (Whew)
Posted by Rice Freeman-Zachery - See more at: http://www.createmixedmedia.com/blogs/the-creative-life/groovy-folded-one-sheet-booklet-video-tutorial-whew#sthash.lQrIu7uE.dpuf

Hey, hey, it’s my birthday! Well, not today–but Sunday is. And so I thought I’d do a video tutorial to share this cool little booklet I found when I cleaned out the studio. I made it years ago from a pattern from somewhere (and if you know who designed the pattern, please post a comment telling us so we can be grateful for their cleverness and generosity in sharing it way back then).
Freeman-Zachery bookletHere’s the really-simple pattern you can print out for practice:
Groovy booklet pattern PDF

And here’s the video tutorial where you can follow along. Link above.
Once you’ve made a couple, you’ll get all kinds of ideas for variations, and that’s where the fun starts!

Alternative Art Journals_150If you’d like more ideas for art journals that aren’t just your standard book, check out Margaret Peot’s Alternative Art Journals.

Ricë is the author of Living the Creative Life, Creative Time and Space, and Destination Creativity. She also blogs at The Voodoo Cafe.

- See more at: http://www.createmixedmedia.com/blogs/the-creative-life/groovy-folded-one-sheet-booklet-video-tutorial-whew#sthash.lQrIu7uE.dpuf